

How to Set Up Plantronics Savi 8000 Series Headset
The Plantronics Savi 8000 series headsets are excellent DECT wireless headsets that connect to desk phones, computers and mobile phones. If you recently purchased one of these you made a great choice. You can't go wrong with its noise cancelling mic, active noise cancelling earcups (in the stereo model), 180m of wireless range, up to 13 hours of talk time and a whopping 50 hours of standby battery time.
But to take advantage of this incredible wireless range and the freedom it provides, you first need to set it up and pair its Bluetooth with your devices. Here is a step by step guide on how to do that:
[lwptoc]
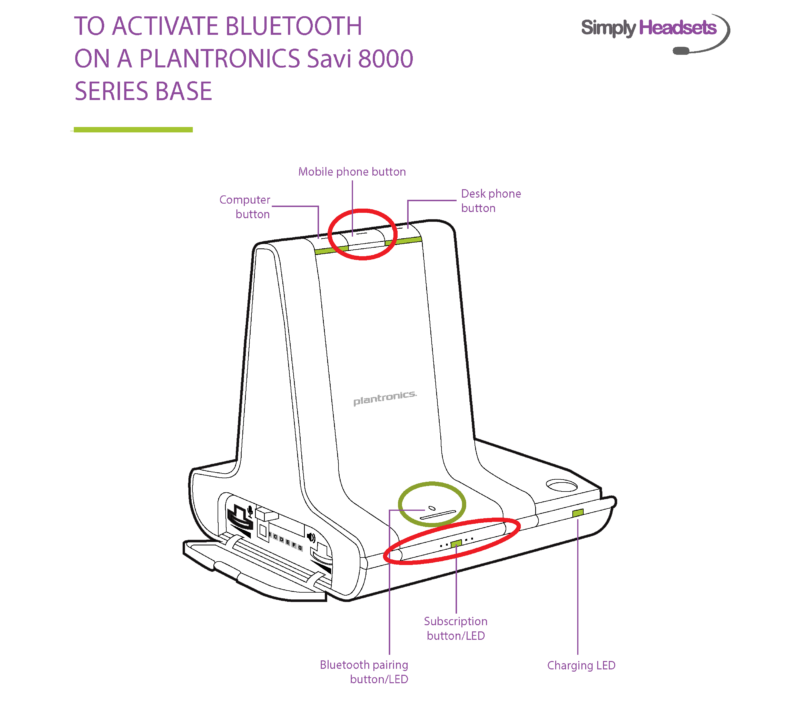
How to Activate Bluetooth on a Plantronics Savi 8000 Series Headset
-
- Hold down the subscription button/LED and the mobile phone button at the same time (circled in red in the
above diagram). The subscription button is the long black button on the left side at the front of the base with
the green/yellow led on it. The mobile phone button can be found on the top of the base with the image of the
mobile directly under it. - You should only need to hold the buttons for a few seconds; you will see the mobile button at the top of the
base flash green. Once it flashes green Bluetooth has been turned on. - Then to put the headset into pairing mode hold the BT button (circled in green on the above diagram). Hold this
down till you see the Bluetooth symbol start flashing red and blue. - Once this is flashing, you will be able to search for devices from your phone or tablet and pair to the headset.
If your device asks you for a password to connect it is - 0000 - If you ever want to turn Bluetooth back off, just hold the subscription and mobile button again and the mobile
button will flash red to indicate BT has been deactivated. - If you are using the Plantronics Hub Software, Bluetooth can also be turned on and off under the settings tab.
https://www.poly.com/au/en/support/downloads-apps/hub-desktop
- Hold down the subscription button/LED and the mobile phone button at the same time (circled in red in the
How to Turn on a Plantronics Savi 8000 Series Headset
But what if you just bought one, took it out of its box (maybe even filmed an unboxing video) and found that it didn't work? Well you wouldn't be alone, but thankfully it's a quick and easy fix before you're on your way to wireless headset nirvana.
We hear from customers all the time that their Poly/Plantronics Savi 8210 or Savi 8220 doesn't work when they receive it. And usually it's quickly resolved by us asking them 'did you turn it on?' and then telling them where the on/off switch is located. We understand the confusion as most DECT headsets don't have an on/off switch, so you are in the clear for thinking that your headset isn't working.
After all, your previous DECT headset turned on without you needing to flick a switch. So why doesn't this one?
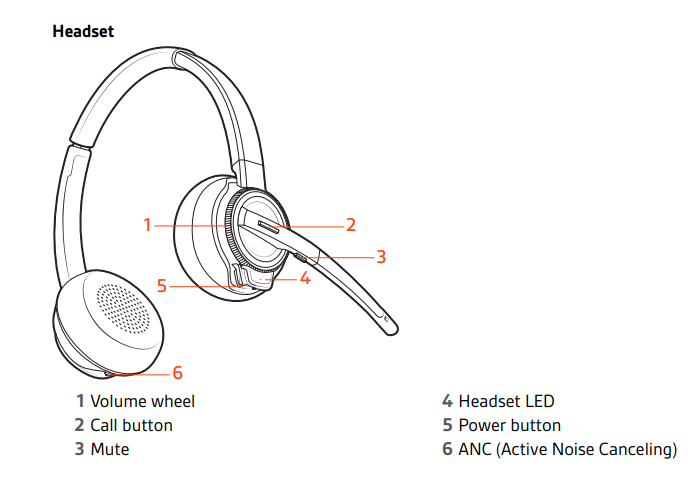
Well luckily for you, if you are reading this and thought your headset was broken, it most likely isn't and just needs to be turned on. To turn on your Poly/Plantronics Savi 8200 series headset, simply slide the power switch on the bottom of the ear cup until it turns green.
Wondering where the power switch is exactly? If you have the 8220, which is the model with two ear cups then it will be on the ear cup that has the microphone attached. If you have the 8210, which is the model with one ear cup, then there is only one ear cup so that's where the switch is!
Hopefully that solves your problem and your Savi 8220 or 8210 is working perfectly now. Here's to many happy years together!
Call Simply Headsets For All Your Headset Support Needs
If your Plantronics Savi 8200 series headset still isn't working after turning it on then feel free to get in touch with our headset experts at Simply Headsets (if you purchased it from us) and we will gladly help you out. We offer lifetime support for all our products and will do everything we can to ensure you are happy and satisfied with your purchase.